The majority of students use either Microsoft Word or Google Docs for drafting, and while Google Docs offers a number of advantages, in my experience, Word is far more powerful when it comes to specific tracking needs of dissertation students.
In this article, I’ll walk you through the top three features I use when editing dissertations and working with revising students: tracked changes, comments, and file names.
To track changes in Word, go to the “review” menu. You’ll see a section labelled “tracking” where you can turn the “track changes” feature on or off.

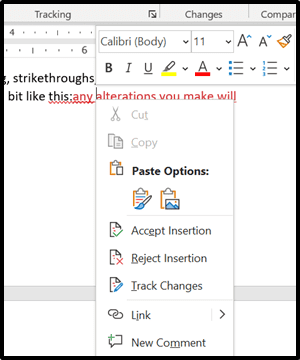
When the feature is switched on, Word will use red underlining, strikethroughs, and comment boxes to show you alterations you make to your document. It will look a bit like this:

You can choose to accept or reject any change by hovering your mouse over the text in question, clicking the right mouse button, and choosing “accept…” or “reject…” as below.

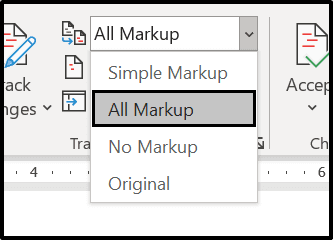
Notice the drop-down menu for “markup” – it can get pretty difficult to work with a document covered in red underlined or stricken-through text. To make the changes you are tracking invisible while you work, simply choose “simple markup” or “no markup” from the drop-down menu. This will hide the tracked changes – but they will still be there, and you can view them again by choosing “all markup.”

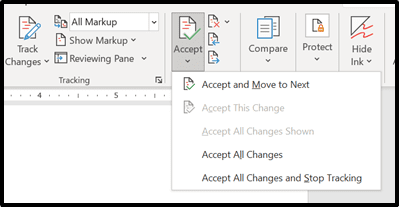
You can use the “accept” button on the tool bar to accept or reject changes too – highlight the text you want to accept or reject changes in, and then hit the button or choose from the drop-down menu. This is a great option for accepting or rejecting all of the changes in a larger selection of text (like a whole paragraph or section) in one go.

If multiple people make changes to a document, the changes are tracked in different colors. Thus, you can see the edits your proofreader made in one color and the last-minute corrections you made to your data in a different color. This makes it very easy to keep track of the different stages of revision your draft has gone through.
The ability to track changes and change your mind about them is invaluable for dissertation students, because drafting is rarely a straightforward process. Sometimes you can work all night rewriting a paragraph, only to have your supervisor tell you it was better the way it was before. Sometimes you want to disagree with a change made by a proofreader/editor. Sometimes your cat walks across your keyboard. Whatever happens, tracked changes enables you to reverse a revision easily.
As a final note, tracked changes is great for motivation. All that red means you’ve made progress – it’s pretty hard to argue with that kind of hard evidence.
If you’ve already had feedback from a supervisor or chair, you’ll almost certainly already have seen comments in use in your document. The appear as bubbles at the side of your page, linked to highlighted text, like this:

Comments aren’t just for advisors and chairs, however – you can also use them to leave notes for yourself. Highlight and right-click on any piece of text, and you will see a “new comment” option. Notice that each comment shows the name of the commentator and the date/time the comment was left. This means you can tell which comments belong to which person and how recent each one is.
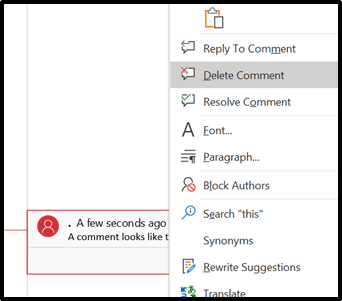
When you have dealt with a comment, you can choose to delete it, “resolve” it (it will be greyed out and marked resolved, but you will still be able to see it, read it, and re-open it if you need to), or reply to it with another comment. Just right-click on the comment, and you’ll see all of these options in the menu.

By using comments with intentionality, you can easily keep track of your ideas and your progress through a given set of revisions.
This will enable you to see the progress you have made, return to previous versions of your work easily, and never submit the wrong file by accident again.
A good file-saving protocol for dissertation students to follow is to begin each new round of revision by opening the current draft, immediately saving it as a new document by choosing “save a copy” from the file menu, and then turning tracked changes on in the new file before beginning work. When you have finished work, save a copy again and use the “accept all changes and stop tracking” option from the tracking menu.
This will provide you will a clean, un-marked copy, ready for turning in.
How should you name your files? Always use a descriptive title plus a date and a version number (if you happen to create multiple drafts in a single day). A few examples might be:
Whatever you do, make sure your files name enables you to quickly identify your most recent draft and your un-marked turn-in-able copy easily. And remember, most operating systems list files names alphabetically, so keep that in mind as you think about how the files will be listed in the folder!
With these three file-management tools under your belt, you should find it easier to keep your revisions in order and under control.
